DTF transfers workflow is the backbone of modern apparel production, guiding every step from concept to finished garment. When optimized end-to-end, contemporary DTF systems deliver faster turnarounds, tighter quality control, and lower waste for small- to mid-sized brands, bleeding fewer bottlenecks into downstream operations. This guide emphasizes color management for DTF transfers to keep colors faithful from design to fabric. From design briefs and file prep to printing readiness and packaging, a repeatable rhythm reduces rework, errors, and delays across teams. With clear documentation, standardized checks, and smart automation where possible, you ensure consistent results and scalable output and efficiency.
Viewed through the lens of a production pipeline, the DTF process unfolds from concept art to coated film and final garment. In practice, teams describe the film-to-fabric transfer sequence, the prep stage, and the heat-application as a cohesive flow. Applying Latent Semantic Indexing (LSI) principles, this language uses related terms like production pipeline, film-to-fabric transfer sequence, and printing workflow to signal semantic relationships. Managing these stages with standardized presets and proactive QA helps brands scale without compromising quality. Framing the work as a connected system aligns creative intent with manufacturing realities, enabling quicker feedback loops and consistent results.
1. Design and file preparation for DTF transfers workflow
The foundation of a reliable DTF transfers workflow starts with design readiness. Provide your design team with clear guidelines on file formats, resolution, color space, and bleed, aiming for 300 dpi or higher for raster artwork and preserving scalable vectors where possible. Export high-quality PNG or TIFFs with transparent backgrounds when needed, and enable soft-proofing to anticipate how colors will render on fabric. This aligns the design intent with the final print and supports the broader objective of an efficient DTF printing workflow by reducing last-minute changes and misprints.
Color management at this stage is critical. Implement a robust color-space strategy and, when possible, embed ICC profiles in your files along with a calibrated monitor profile so the designer’s intent translates accurately to the print. This is the backbone of color management for DTF transfers, helping narrow the gap between digital expectations and physical results. Document printable areas, bleeds, and color channel data to prevent surprises in the prepress and printing steps, ultimately contributing to smoother production and less waste.
2. Prepress for DTF: turning design into color-ready film
Prepress for DTF is where design intent begins to become material. This stage often involves color space conversions, halftone screening, and preparing the film’s adhesive properties, typically via a RIP or a dedicated DTF software solution. The goal is to generate a film that, once printed and cured, yields colors faithful to the designer’s intent on the chosen fabric. Thinking in terms of the direct-to-film process helps teams select the right workflows and hardware for consistent results.
Develop standardized presets for different fabrics and blends, such as light polyester or cotton blends, to minimize color drift and rework. Maintain a catalog of substrate-specific color profiles to speed up decisions and ensure consistency across orders. This is a core element of DTF transfers optimization, enabling repeatable outcomes across batches and reducing the risk of surprises during printing and finishing.
3. Printing workflow: the heart of the DTF transfers process
Printing is where design, color management, and film quality converge to produce the actual transfer. A robust DTF printing workflow relies on clean film handling, stable ink levels, and precise nozzle performance. Regular maintenance—nozzle checks, head alignment, and calibration—keeps equipment at peak accuracy. Coupled with efficient job batching and queue management, this minimizes machine idle time and supports predictable production across orders.
Batch processing for small runs can dramatically reduce setup time by reusing templates, color profiles, and print parameters across designs that use the same substrate. Also pay attention to film handling: proper storage and humidity control, plus a well-managed adhesive layer, help ensure clean transfers and reduce ghosting or partial transfers. A well-tuned printing workflow thus supports reliable color fidelity and reduces waste in the direct-to-film process.
4. Curing, powdering, and finishing: finalizing the direct-to-film process
After printing, curing is essential to fix inks and preserve adhesion during the heat-press stage. Calibrate cure time and temperature to your ink set and fabric type, and validate parameters with test swatches. Inconsistent curing can wash out colors or weaken adhesion, undermining the overall DTF transfers workflow. Keeping rigorous records of curing conditions for different substrates helps deliver consistent results across runs.
Powdering and the subsequent heat-press stage complete the transfer. Even powder distribution reduces sticking and ensures clean separation from the film, while proper curing prevents texture issues on the final garment. The heat-press step benefits from strict temperature control, precise pressure, and appropriate dwell time based on fabric type and ink density. Standardized heat-press protocols and a quick post-press inspection checklist catch issues early and protect brand quality.
5. Quality control, color fidelity, and automation: elevating DTF transfers workflow
Quality control extends beyond a single check; it is an ongoing discipline that reinforces color fidelity and brand integrity. Use both visual inspections and data-driven QC methods, including colorimetric readings and density measurements. Establish a simple, repeatable QC checklist covering color accuracy, alignment, film cleanliness, and powder residue. Document troubleshooting with root-cause analysis to determine whether issues arise at design, prepress, printing, curing, or finishing stages.
Automation and production management are key to scaling. Invest in job management software to queue orders, assign tasks, and track throughput at each stage. Create templates and standardized recipes for common garment types, sizes, and colors, including prepress profiles, print settings, curing times, and heat-press parameters. This approach supports DTF transfers optimization and ensures consistent results with minimal manual intervention, helping teams deliver high-quality transfers faster and with less waste.
Frequently Asked Questions
What is the DTF transfers workflow and why does it matter from design to delivery?
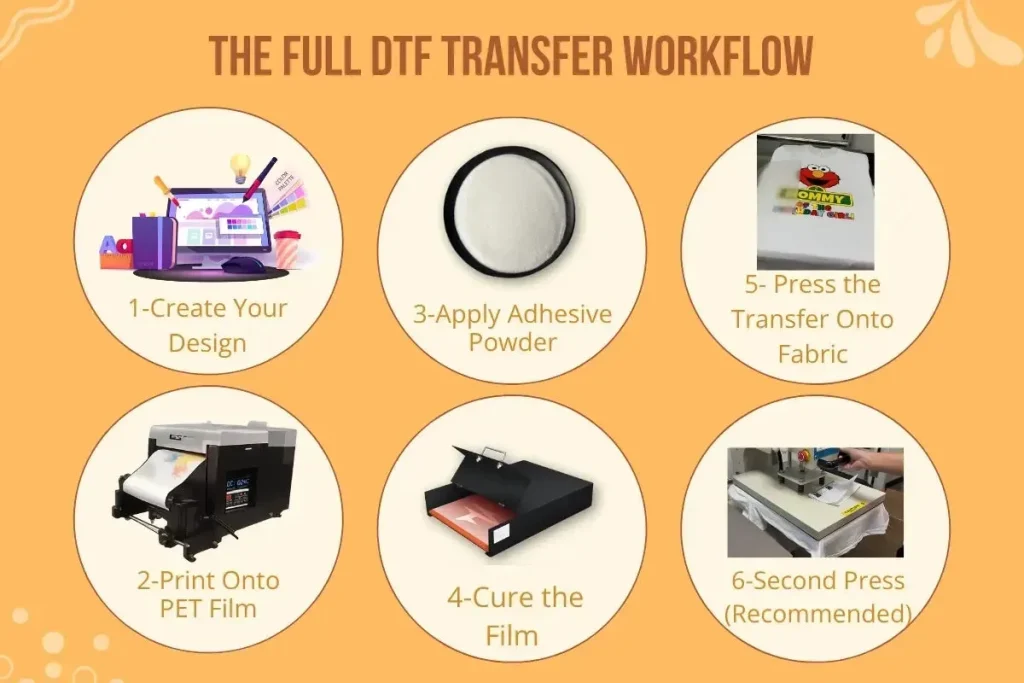
The DTF transfers workflow is the defined pipeline that turns a digital design into a physical transfer on fabric, covering design, prepress, printing, curing, powdering, and heat pressing. Optimizing this end-to-end improves color fidelity, reduces bottlenecks, minimizes waste, and speeds delivery, making it the backbone of modern apparel production.
How can you optimize the DTF printing workflow to speed up production without sacrificing quality?
Enhance the DTF printing workflow with batch processing, reliable film handling, and routine printer maintenance such as nozzle checks, head alignment, and calibration. Use templates and standardized print parameters across designs to reduce setup time and improve repeatability, which is central to DTF transfers optimization.
What steps in prepress for DTF ensure color fidelity and predictable results?
In prepress for DTF, convert color spaces correctly, create substrate-specific halftone presets, and prepare the film with appropriate settings using a RIP or DTF software. Embedding ICC profiles and using soft-proofing helps align the designer’s intent with the final garment, supporting consistent results.
Why is color management for DTF transfers critical, and how do you implement it across fabrics?
Color management for DTF transfers is essential to ensure digital colors translate accurately to fabric. Implement soft-proofing with ICC profiles, calibrate monitors, embed profiles in files, and establish color targets for common garments to minimize drift and rework.
What are best practices for the direct-to-film process from design to packaging to reduce waste and defects?
Adopt a repeatable, documented pipeline from design to packaging: finalize design guidelines, standardize prepress and printing setups, ensure proper curing and powdering, and verify heat-press parameters and final QC before packaging. Automation and templates help minimize waste, errors, and turnaround times in the direct-to-film process.
| Stage / Topic | Key Points | Impact / Benefits |
|---|---|---|
| Design and file preparation |
|
|
| Prepress for DTF |
|
|
| Printing workflow |
|
|
| Curing, powdering, and finishing |
|
|
| Quality control and color fidelity |
|
|
| Workflow automation and production management |
|
|
| Troubleshooting common issues |
|
|
| Real-world examples and takeaways |
|
|
Summary
DTF transfers workflow is the backbone of scalable, high-quality apparel production, and optimizing it is a holistic effort from design to delivery. By standardizing design and file preparation, prepress, printing, curing, powdering, finishing, and packaging, you reduce bottlenecks, improve color fidelity, and shorten time-to-market. A repeatable process supported by color-managed workflows and smart automation enables on-demand and small-batch production without sacrificing quality. With disciplined validation, documentation, and continuous improvement, brands can consistently deliver compelling, accurate transfers at scale.